 ART
ART
A few weeks ago, we had another big fat Bollywood wedding in the family! My older brother-in-law tied the knot, and it was a beautiful, emotional event (mashAllah) full of bhangra, delicious food, and moving speeches. South Asian weddings are not one or two-day events. Oh no - our weddings are weeks-long celebrations that include duas (communal prayers for the couple) and dholkis (dance parties at aunties’ houses) that lead up to the main wedding events.
These smaller events are basically the Muslim version of pre-gaming; they get us psyched for the wedding with choreographed performances and out-of-tune singing sans alcohol 🙃.
My mother-in-law hosted one of these pre-wedding events, and asked me to make the favors. I’m very close to my in-laws, so naturally, I was eager to help out, especially with wedding prep which is always a roller coaster ride great time to express my creativity.
Choosing the right favors
Choosing wedding favors is tricky. They’re a token of appreciation to thank your guests for attending, but you don’t want them to be lame, or tacky, or useless - something people will throw out. There was no room for boring and unoriginal in my mind. This was a Munir wedding, and I was bound to do my small part to make it different.
#famouslastwords
I found these adorable sugar cookies on Etsy, but decided to make them myself from scratch because the local bakery was charging me $600 there’s nothing like homemade baked treats. I also decided to decorate these cookies with a mehndi (henna) pattern in a variety of bright colors to fit the wedding theme. And of course, I decided to make the royal icing by hand too. If you’re going to take on a challenge, might as well go all out right?
Let me preface the rest of the blog post by admitting that prior to this:
I had never baked sugar cookies before.
I had never decorated sugar cookies before.
I had never made royal icing before.
I was about to embark on a baking adventure that would be full of ups (making a delicious, soft cookie that earned the husband’s approval) and downs (stuffing my sad, sobbing face with ruined cookies because my first attempt at icing turned out too watery and oozed all over the cookie).
The rest of this post is about how I learned to make, decorate, and package mehndi / henna cookies that were presentable enough to be wedding favors - and the challenges I faced along the way. If you’re crazy brave enough to make these too, here’s an overview of what you’ll need. By the way, the exact quantities are available in the recipes linked in the table.
For baking(recipe from Katrina’s Kitchen) |
For icing(recipe from Follow the Ruels) |
For wrapping(packaging from Amazon) |
|
|
|
Challenge #1: Finding a good cookie recipe
The first step of this process involved finding a good cookie recipe. I’m not a fan of store-bought sugar cookies because they’re often too hard and sugary. I like my cookies soft, chewy, without overpowering sweetness. After some Googling, I came across an intriguing recipe. It included almond extract and promised soft, flavorful cookies in less time and steps.
I decided to give the recipe a try and made a test batch. The cookies were indeed soft. but still sturdy enough for decorating. Plus, they had a hint of nuttiness and didn’t taste overly sweet. Success!
Too bad I forgot to take pictures of this part. Fail.
Solution: Best sugar cookie recipe ever
The recipe I followed to bake the cookies was from Katrina's Kitchen blog. I followed her instructions exactly and made about 3 batches for a yield of 60 cookies. Once I had baked the cookies, I placed them on individual squares of parchment paper to allow them to cool without sticking to each other. The cookies need to cool completely before you can decorate them, otherwise the icing will melt.
Baking tip: I used a 3 inch square cookie cutter from Amazon. This is a good size for decorating. These cookies will retain their shape and won’t expand during baking.
Challenge #2: Learning how to make royal icing
Sugar cookies are normally decorated with royal icing. Upon reading this, the first question you probably have is, “What the heck is royal👑 icing?” because it’s also the first question I had. Well, royal icing is a type of icing made from egg whites (or meringue powder) and confectioners’ sugar. It dries hard so it’s very versatile. It's often used to decorate gingerbread houses and pipe details onto cakes.
Baking tip: Royal icing can be made with meringue powder or egg whites. I’d recommend the meringue powder route to avoid frosting with raw eggs. You also don’t need to sift the sugar, unless your sugar has huge lumps in it.
Solution: Super useful video tutorial
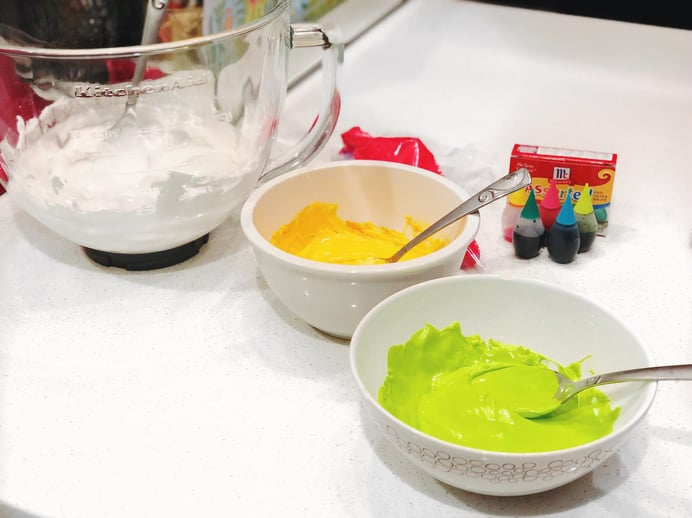
I used Follow the Ruels’ royal icing recipe. I had tried a few others, but this was my favorite because it included vanilla extract. I made the icing in my KitchenAid mixer, then divided the glossy white icing into bowls. I wanted the cookies to be as vibrant and pretty as the outfits at South Asian weddings, so I used liquid food coloring to dye the icing a variety of bright hues.
Once I was happy with the colors, I turned my attention to the consistency. Although royal icing is easy to make because it only requires a handful of ingredients, nailing the different consistencies is tricky.
For the background base layer, I used flooding consistency icing. For the intricate details, I used piping consistency. I’m not a pro baker, but I can tell you that the main difference between these consistencies is the amount of water. Flooding consistency requires a bit more water, making it thinner and thus easier to spread. Piping consistency is stiffer so your design holds its shape.
Baking tip: The best way to understand the difference between the consistencies is by watching this video.
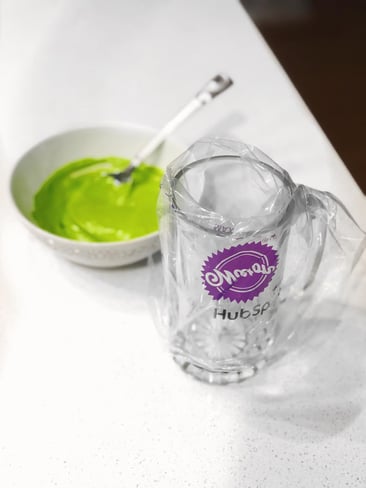
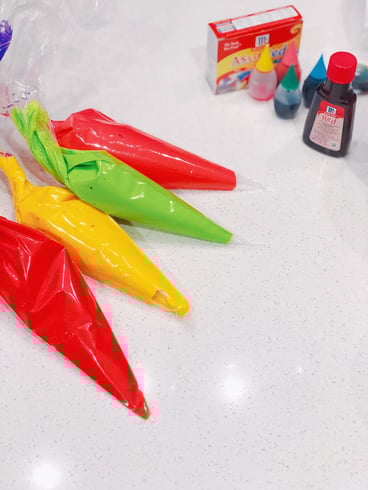
When I was finally happy with my consistencies, I placed the icing into disposable decorating bags. To easily fill the decorating bags with icing, place the bags inside large glasses and turn the sides over. Then, plop your icing into it. One the bag is full of icing, remove it from the mug and twist the top until it resembles a cone. Now, it's time to decorate!
Finally ready to decorate!!!
Challenge #3: Decorating the cookies with a henna pattern
Decorating one, or two, or ten cookies is no problem... but what about 60?! That's the number my mother-in-law had given me as the headcount for the pre-wedding event. Gulp.
Decorating was the part I was most looking forward to. I used to paint and draw a lot as a child, so I have some skill with my hands. Last year, I also decorated mehndi trays for my other brother-in-law’s wedding (these will show up later in the post 😉). The challenge was, how could I scale my perfectionist tendencies to 60 cookies without compromising their design?
Solution: Working in layers and batches
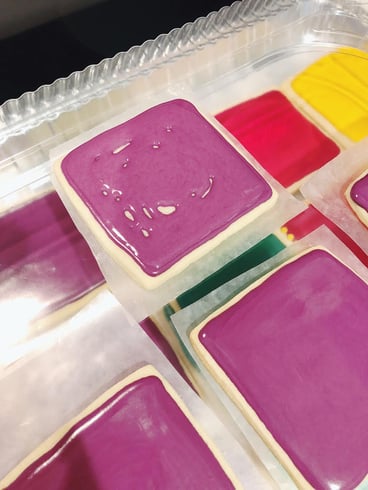
I resisted the urge to complete each cookie one by one. Instead, I decorated the cookies in two stages. During the first stage, I focused on icing the background layer on all of the cookies. I used flooding consistency icing to create a solid, square outline on each cookie.
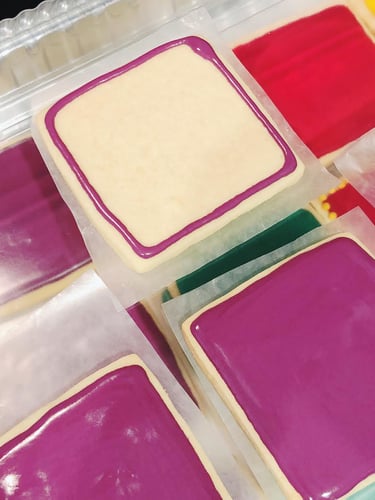
Then, I filled it in with icing and used a toothpick to blend the lines together.
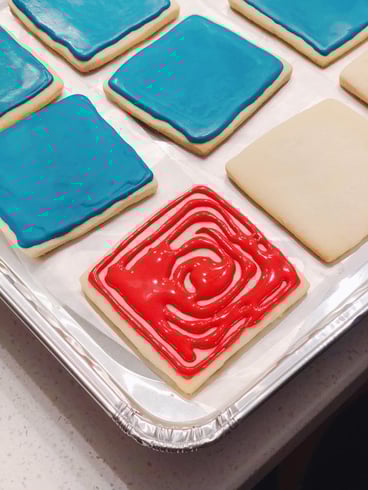
No, the cookies did not magically change from purple to red... I just took pictures of different cookies at different stages 😅
Baking tip: Royal icing takes about 8 hours to harden completely, but you can start piping the mehndi / henna pattern after 3-4 hours.
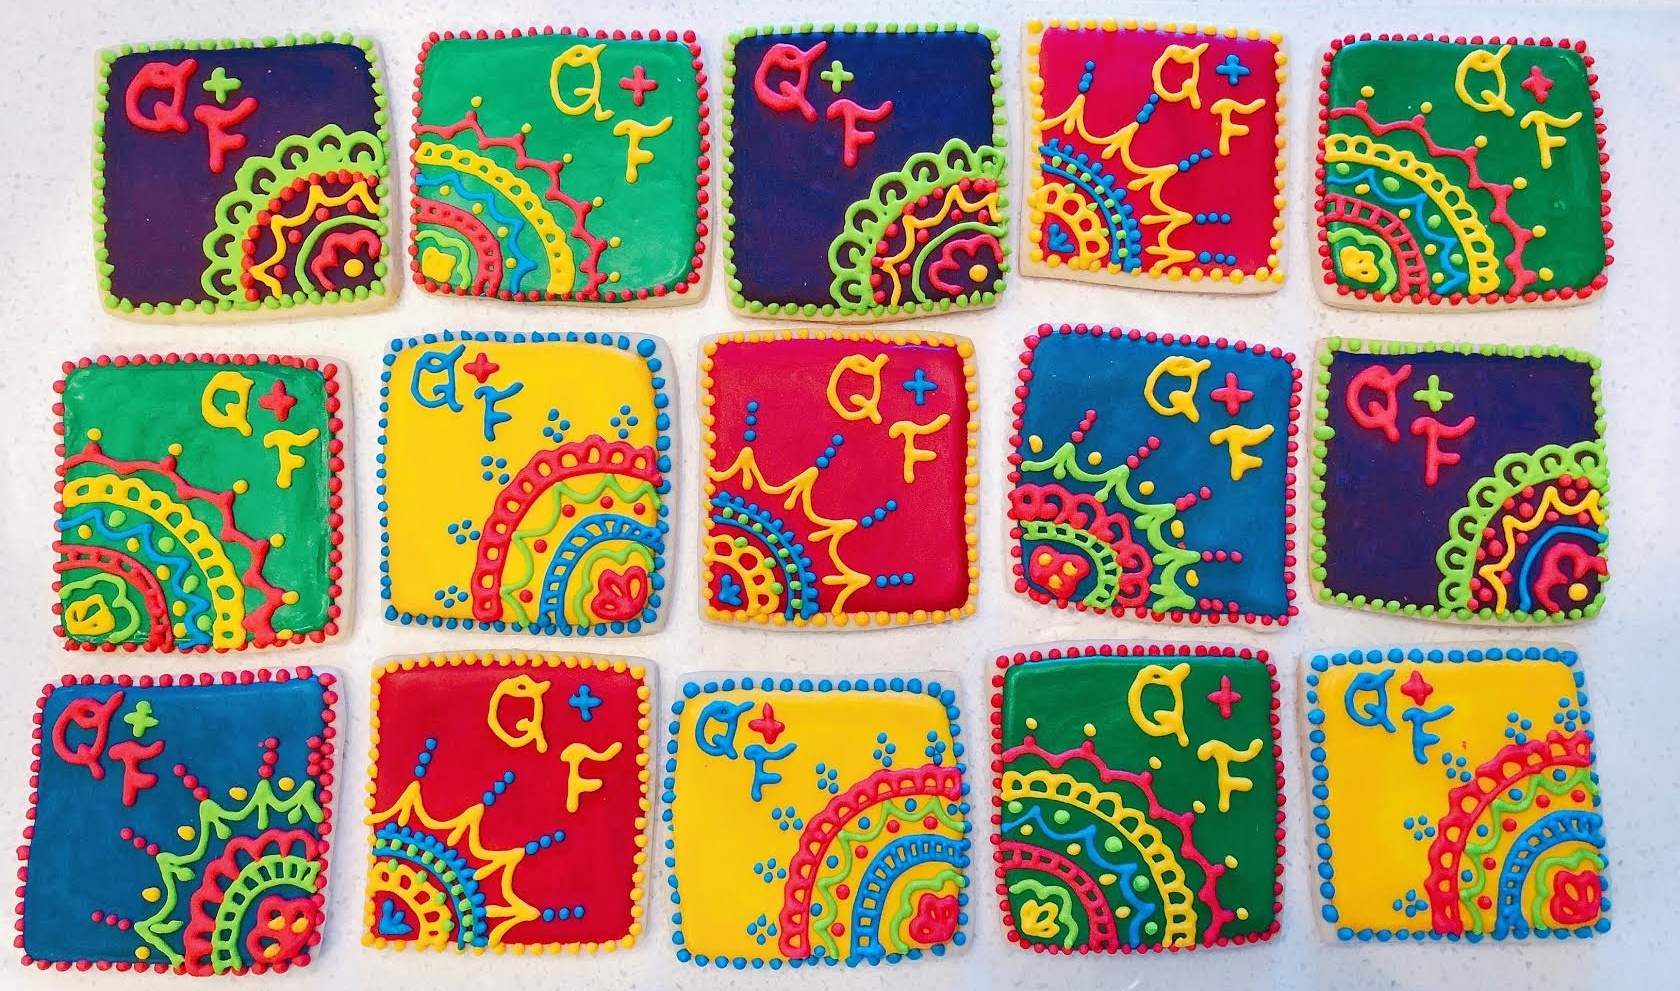
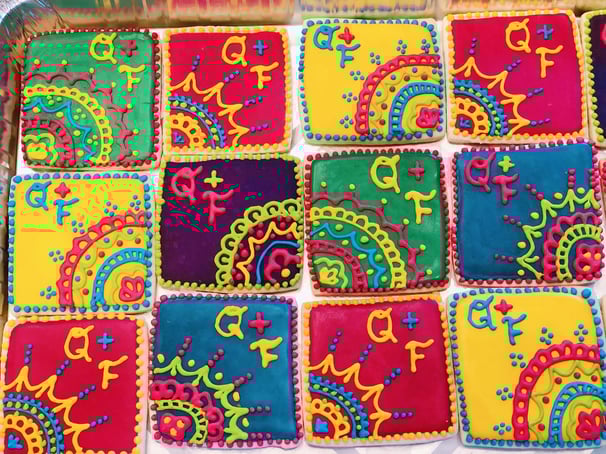
When it was time for the second stage (i.e. the base layer had cooled for about 3-4 hours), I used piping consistency icing to draw the mehndi / henna pattern onto the cookies. Mehndi patterns are super fun to create because they involve paisleys, swirls, dots, and there really isn’t a wrong way to do it! I worked in batches and piped the same design elements on 8 cookies (like a production line… of one person).
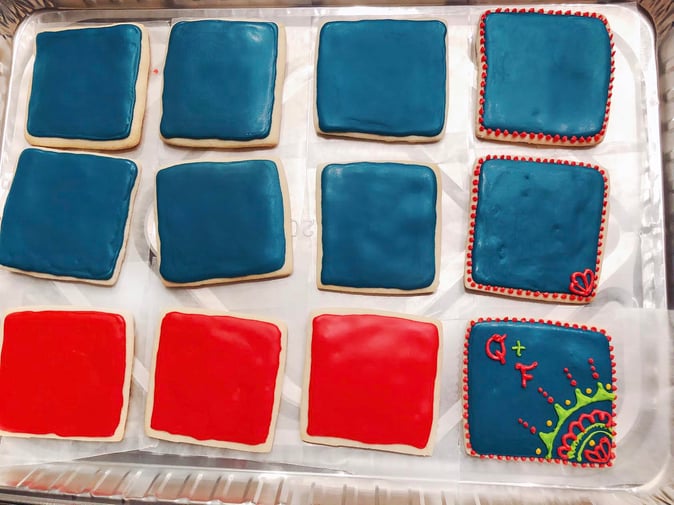
For most of the details, I didn’t use an icing tip. Instead, I kept things simple and just cut the tip of the icing bag off. I did however, use this icing tip for the letters Q + F in the corner of the cookie (my brother-in-law and his wife’s initials).
Baking tip: Adding a dotted border is a great way to jazz up the cookie and it also hides the rough edges of the base icing layer.
Cookies in all the colors of a rainbow desi wedding
Baking tip: Allow the fully-iced cookies to dry overnight before stacking or packaging them. Royal icing may look like it's dry within a few hours, but gentle pressure will make it crack and ruin your design. To avoid air exposure, place the cookies in a large aluminum foil tray in a single row and cover tightly with a lid.
Challenge #4: Packaging the cookies for freshness
Shockingly (to no one), these cookies take a long time to make (at least a few days), so the next challenge was, how could I keep them fresh until the event? There was no point in exerting all this effort to make the cookies if they’d go stale before the guests actually ate them. These cookies are EDIBLE art and gosh darn-it they should taste as delicious as they look.
Solution: Self-sealing cellophane bags
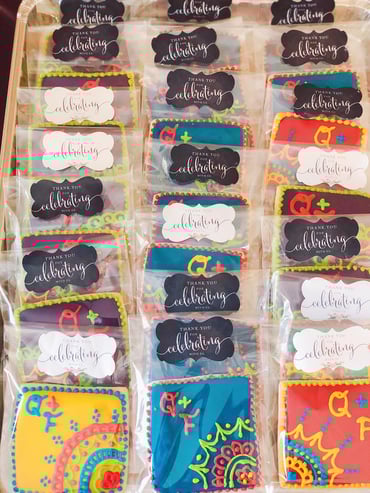
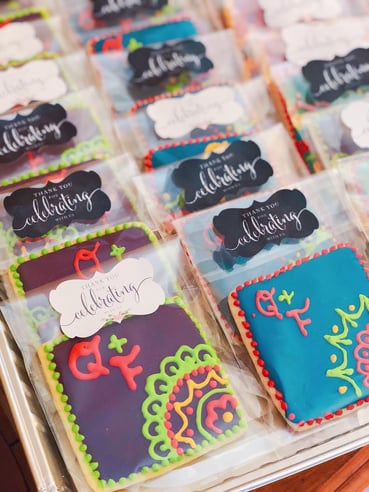
I read online that pro bakers heat-seal sugar cookies into cellophane bags, which keeps them fresh for up to 3 weeks. I ordered these clear, self-sealing bags from Amazon and placed one cookie in each (after the icing completely hardened overnight), making sure I got as much air out of the bag as possible. As a final touch, I added these “thank you” stickers to each bag.
Baking tip: Recruit friends to help you package the cookies 😄.
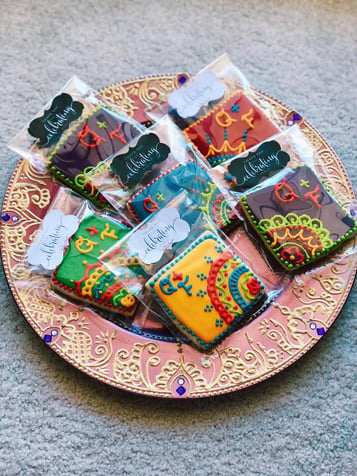
On the day of the event, I arranged the cookies on a mehndi tray, that I had also decorated, to make a nice tabletop display of colorful, edible favors! Voila!
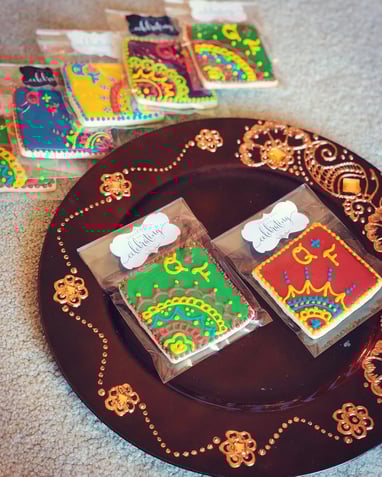
Challenge #5: Convincing aunties I made them
After 3 days and nights of hard work, stress-yelling at Saad, and an unquantifiable number of minor panic attacks, the cookies were baked, decorated, packaged, and sealed! My mother-in-law and brother-in-law’s happiness at seeing the cookies made them worth all of the effort - corny, I know, but it’s the truth.
As I was handing out the cookies on the day of the pre-wedding event (dua), another challenge that popped up was convincing aunties I had made these myself. I got a lot of, “Which bakery did you order these from?” and “Is there a baker in the community that makes these?” and "Did you get these online?"
Solution: 🤷🏽♀️
Yes, aunties were bewildered I had made these (truth be told, so was I). But I politely reaffirmed that these cookies were hot and fresh straight from Annum’s Cambridge kitchen 😊. It was also great to see my mother-in-law proudly showing off the cookies to her friends.
This baking adventure reminded me that one of the best feelings in the world is to do something no one - including yourself - believed you could do. I had my doubts, I had my missteps, but ultimately, I succeeded in making mehndi cookie favors from scratch.
And I'm so happy with how they turned out, both in taste and appearance. Allahumdulillah.
Although I don’t plan on pivoting and turning this into a profession, I’m ecstatic I learned a new skill to bust out for those school bake sales when I have kids inshAllah! Or for another family / close friend's wedding.
Or a random night of binge-eating cookies. Whatever comes first.
 ADVENTURE